Archive for the ‘Tuning Tips™ Articles’ Category
January, 2001
Written by Mark Wygent on February 6, 2010 – 8:24 AMIllustration - Drone Reed Manipulation
This month's tip is a visual depiction of our drone reed adjustment theory. It comes to us via the good graces and unsolicited generosity of Kevin Edwards, a proud member of the Atholl Highlanders Pipes & Drums, of Stone Mountain, Georgia. This is a really beautiful area of our great country, and has apparently spawned big talent with regard to computer illustrators, if Kevin provides any accurate indication. He has been sent one of our wide-bodied bass DUATONE™drone reeds, affectionately known as "Andre" as a special thank-you, thus becoming the first prize-winner in our monthly search/entreaty for the best tip. (You may need to wait a wee bitty for this picture to load...)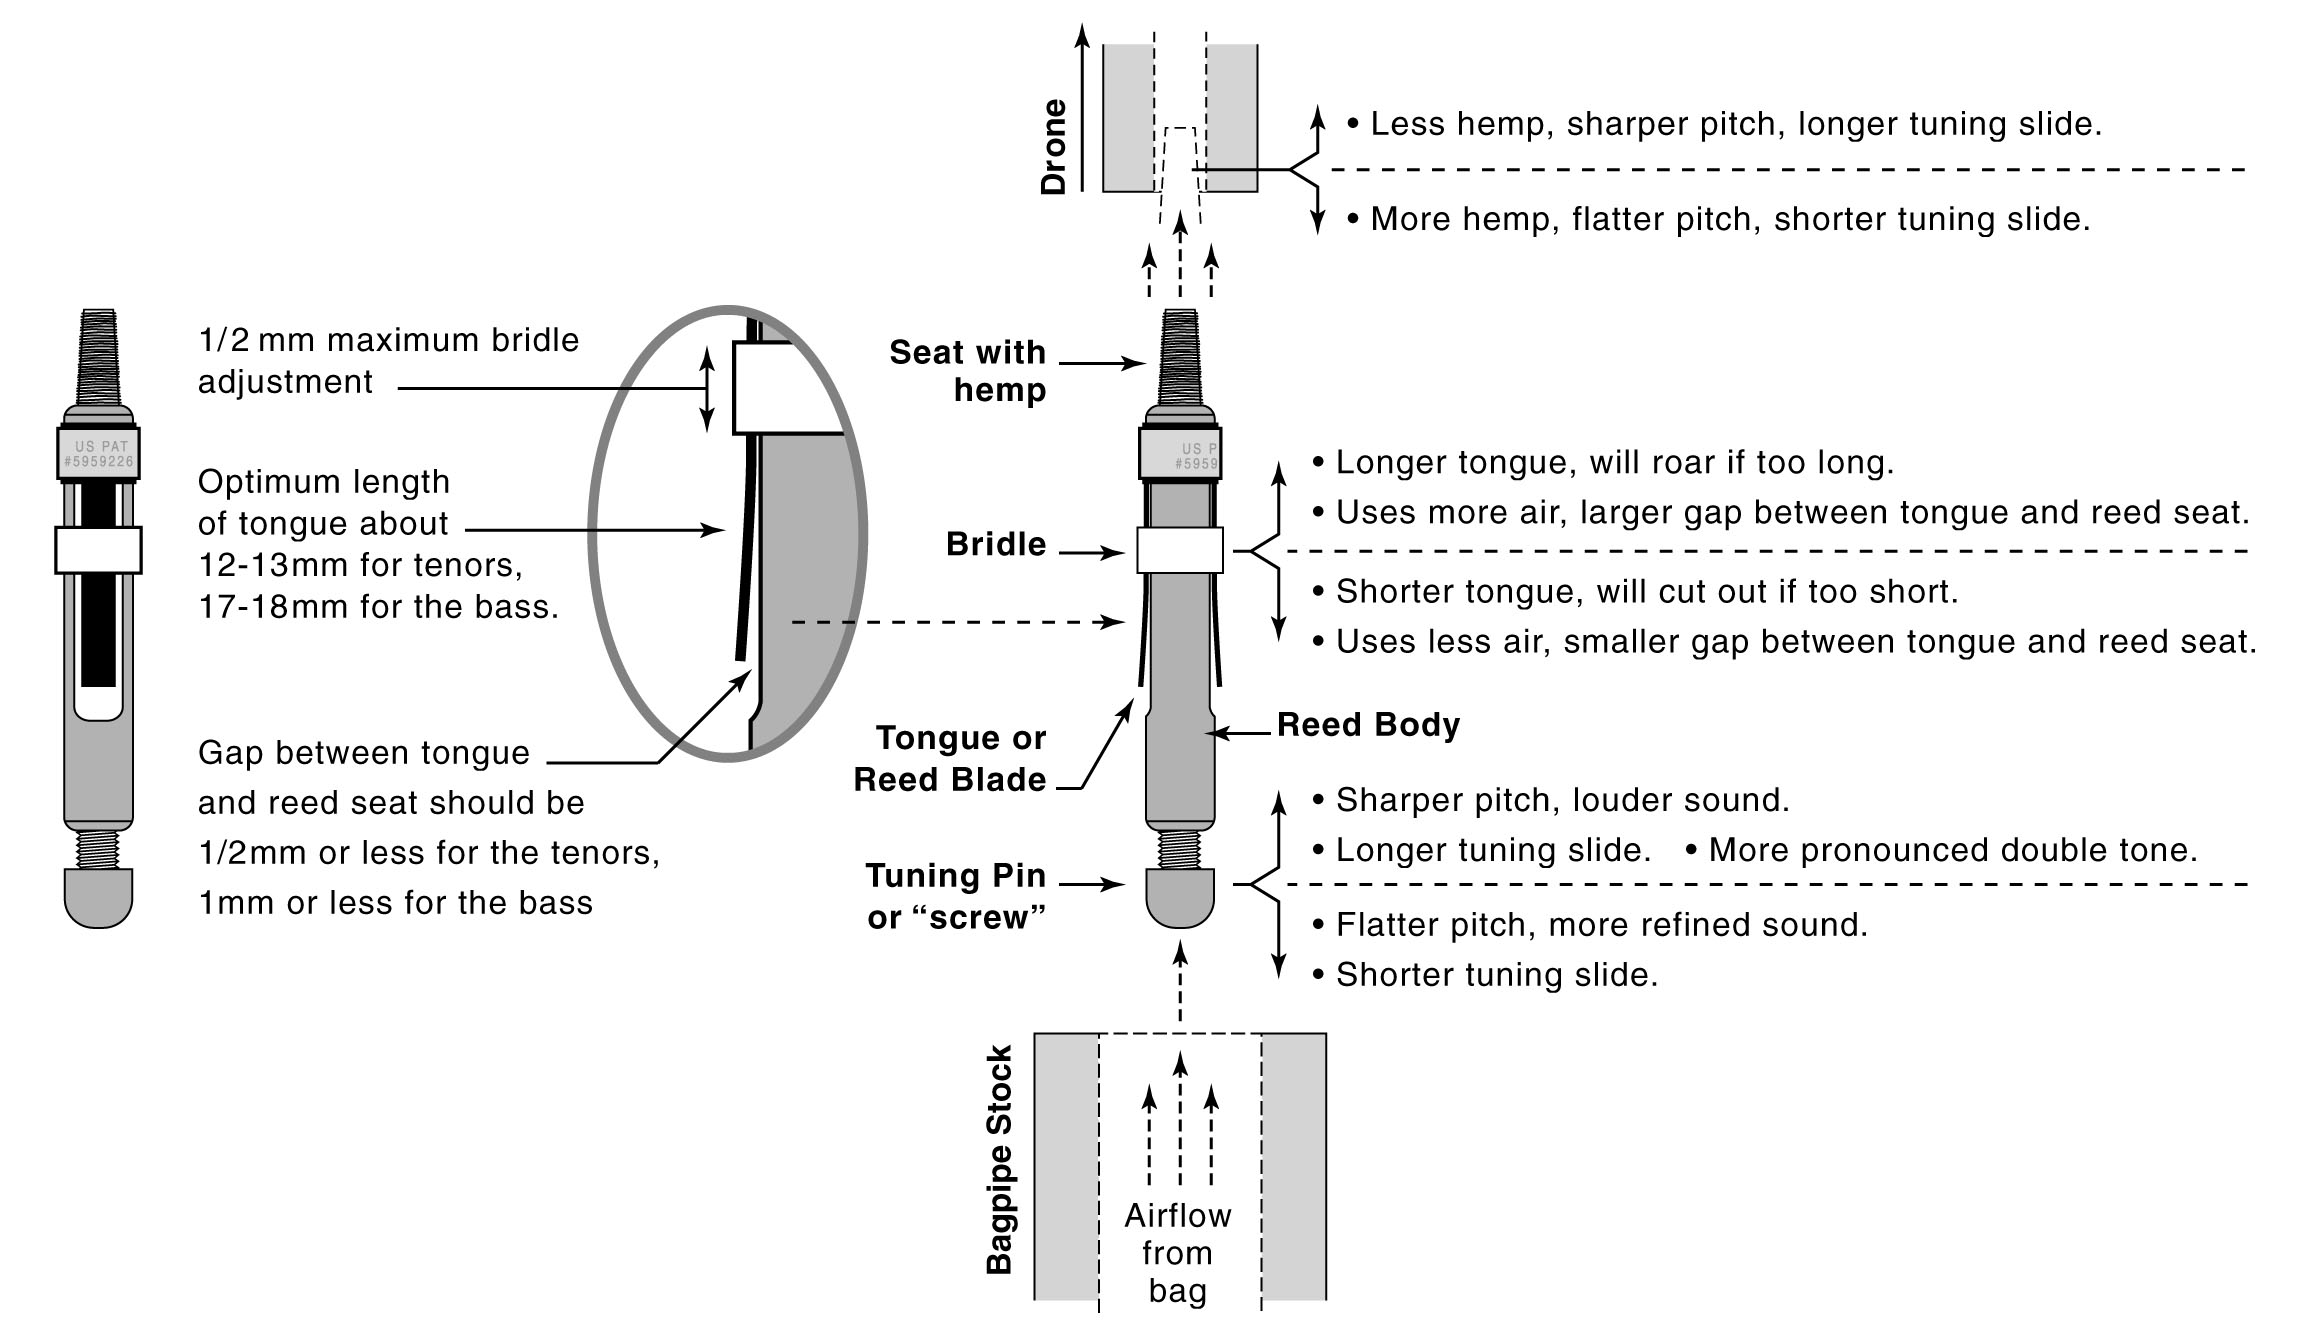
(You may click on the picture for a larger, readable version.)
Your search for a great computer illustrator ends with... edwardsdtp@aol.com
(A legible copy of this illustration is included with every set of drone reeds which we sell. Many thanks, Kevin.)
Illustration of DUATONE™ drone reed, U.S.Patent No.5,959,226 Australian Patent No.1999044707 New Zealand Patent No.337411 Canada Patent No.2,266,172 United Kingdom Patents GB No.2341966 and GB No.2341968, is Copyright ©2001 by, and with the kind permission of, Kevin Edwards. The foregoing is a TUNING TIPS™ document provided by Wygent Reeds. Please refer to our Copyright Notice.
Posted in Tuning Tips™ Articles | Comments Off on January, 2001
December, 2000
Written by Mark Wygent on February 6, 2010 – 8:20 AMMemorizing
It's the time of year for excess, and that vaunted group of piping sadists otherwise known as pipe majors will soon be (if they have not already been) engaged in their annual ritual horror of New Tunes to Learn. Plenty of time yet remains before the rapidly approaching games and parade year is upon us, they will opine; but "have these ten off by February first, guys, okay? It's really important."Oh, sure, sure. We'll just tell our bosses that homework is unusually heavy during January, and we know that he'll be more than happy to cede us an extra 10-14 days of vacation time.
We should probably not approach tune memorization in a negative frame of mind. It most definitely is not conducive to the rapid absorption of knowledge, new or old. So pick a time of day which (if possible) coincides with that period when you are most alert mentally. We always feel as though there is never enough time for everything, so run through this excuse now and get it out of the way. Then pick the time and stick to it.
Remember that most tunes (especially marches) can be broken down into musical or thematic phrases. These phrases are more often than not found to be two bars in length. Our musical idiom often provides for "statement and response", or "question and answer", musically. Take the tune Balmoral Highlanders , for example. The first two bars alternate between a statement of duelingLow-A's, C's, and E's. The next two bars respond with combative Low-G 's, B's, and D's. Learn the tune in these short phrases, one at a time, and you will find that in most instances the melody and memorization will become clearer and stronger in a much shorter period of time than what you may have assumed to be usually necessary.
Many tunes have repetitious one-bar, or two-bar endings in each part. Learn this section once, and apply it to all the other parts. Look for patterns in the musical score, as the sooner you come to recognize them, the more quickly the tune will be learned.
The location where you practice must be comfortable, both physically and mentally. This may take a bit of experimentation, but you'll eventually determine where this place is.
Never attempt to force your mind, especially if over the course of several minutes you have been playing the same phrase mindlessly and without having learnt it. The mind is a beast that will by nature wander. So, whenever you feel that creature pull you strongly away, go with it, and allow it its (momentary) freedom. Fortunately for you, the mind is also easily fatigued, so bringing it back again to the task at hand in a few moments will be a simple affair. This alternating memorization or study technique can really work. The key is not to push too hard, allowing your mind to learn in a more natural way.
Sing or hum the melody of the tune. This is a great way to get the fingers coordinated with the mind, before you have even begun the chore of memorization.
Practice smart. Around here, students know this to mean play it correctly more often than wrongly. Never play a tune through, noticing your mistakes, yet failing to correct them, by using such lame mental excuses or rationalizations as "I'll catch it on the repeat," or "I usually play that movement well, so it's okay." This is rubbish, as it only reinforces the weakness in your playing, instead of building a strength there. For example, say you have eight instances ofE-Doublings in your little two-parted 2/4 march, and you miss six of them, and play two correctly. Congratulations. You have just made your ratio of good doublings to bad 2:6. Play the tune in much the same way again, and you wind up playing theE-Doubling correctly 4 times, and incorrectly 12 times. This means that you are wasting your practice time repeating mistakes, instead of using it to reinforce proper execution. Try this on: The next time you hear a mistake, stop right there and repeat the offending movement three times perfectly. If you miss the third iteration, start again, until you have played that damn movement perfectly three times in a row. Then start the tune over from the beginning, in effect earning the right to play ahead in the tune. Without a doubt, if you are merciless in the application of this discipline to your practice, you will become a much better musician. And quickly. The foregoing is a TUNING TIPS™ document provided by Wygent Reeds. Please refer to our Copyright Notice.
Posted in Tuning Tips™ Articles | Comments Off on December, 2000
November, 2000
Written by Mark Wygent on February 6, 2010 – 8:18 AMQuick Tuning
Many pipers, while attempting to tune their drone reeds to their chanter reed, experience one heck of a time struggling to "get them close", a quaint piping euphemism which has as its analog in the real world, I suppose, the old saw, "Close enough for government work." This approach is fine if you're running (literally) late for the last massed bands grand assemblage, or are not competing, or are not being reimbursed monetarily for your services as a musician. Otherwise, a longer, more tasteful, and hopefully more accurate tuning will always be the order of the day.A prerequisite (and a personal presumption) for the following tip to work is the piper's ability to detect the same note in different octaves, and the ability to recognize the same note intoned by a chanter reed and a drone reed. Almost all pipers will be able to accomplish the latter requirement easily, with the former being sometimes a thornier issue.
Although the tonal qualities of Low A are different on a pipe chanter and in a tenor drone, it remains Low A nonetheless, just as the same note sung by two persons standing together will also have a subtle yet perceptible difference between them. The bass drone is more difficult, as the lower frequency or "beating" of the same note, though only an octave lower from the chanter, is more problematic for us to hear. So, after shutting off a tenor and the bass drone, always tune one of your tenor drones first, preferably the one closest to your ear (the middle drone); then the outside drone to the middle; and finally the bass. (When bringing in the bass, it is sometimes very helpful to shut off one of the tenors, as the gradual transition from dissonance to assonance will be easier to discern.)
But how do we move from where we are when we first pick up the pipe, after yesterday's brilliant practice, to where we want to be, in tune and brilliant yet again? This shall be our credo: We always begin from a point of knowledge, rather than starting from a point of ignorance. Quite simply, this will translate for us as a reminder to deliberately put the tuning sections of our pipe out of tune, either all sharp or all flat in relation to the chanter, so that we know in which direction to shift them for balance, when we begin to tune yet again.
If, when we are finally in tune, we take the time to notice where all three tuning sections of our drones are in relation to the bottom (or stock-side) sections of our pipe, it will be a dead-simple thing for us to push the tuning sections at the start of our next practice somewhere noticeably higher or lower than those positions. (The tenor drones are usually a snap, as your final tuning position should invariably leave some hemp showing on the tuning slide of the lower section, becoming only a matter of a quick visual orientation.)
I prefer to start my tuning flat, as my ear finds it more accommodating to move the drones from a flat pitch (lower than the Low A on the chanter), to a sharper pitch (or higher sound), matching the Low A on the chanter. This gradual sliding of the drone from a lower sound to the one which incrementally rises to match the chanter is simply easier for me to hear. Your head may, and probably does (with heartfelt gratitude to a higher power for such a blessing) work differently than mine, and so you may prefer to move a higher drone sound to a lower one, eventually matching the chanter. Play with it, and experiment to find which method works best for you.
Of course, once the initial tuning is locked in, your chanter reed will begin to change, and in almost every instance will gradually become sharper, or higher pitched, and the tuning sections of your bagpipe will fall slowly toward the stock-side sections, in order to stay matched to the chanter.
One final tip: Develop the habit of always moving the tuning sections of your bagpipe in one direction for shortening the drone (a sharper pitch or higher sound), and in the opposite direction for lengthening it (a flatter pitch or lower sound.) This will, over time, cause a slight "worm" effect on the wrapped tuning pin, so that (for example) by merely twisting the tuning section clockwise, the section lowers; and by turning it counter-clockwise, the section raises. This is extremely useful when doing the delicate final tuning, just prior to a performance. The foregoing is a TUNING TIPS™ document provided by Wygent Reeds. Please refer to our Copyright Notice.
Posted in Tuning Tips™ Articles | Comments Off on November, 2000
October, 2000
Written by Mark Wygent on February 6, 2010 – 8:15 AMArms, Bags, and Accommodations
We're different, are we not? Height, weight, breadth, depth. Arms and hands of different lengths; wrists bony or brawny; fingers short, or fat, or long, or thin; some straight, some crooked. Our tummies are a marvel in diversity. Our backs may be pristine and curved perfectly, or bowed or canted through slight or severe scoliosis.The latest generation of synthetic pipe bags have been a boon to pipers of all sizes and shapes throughout the world, as maintenance chores have been trimmed to a minimum, while maintaining a very high degree of reliability. The best way to try one of these on for size, so to speak, is at a convocation of pipers somewhere (its usual form termed a "pipe band"), where various makes and sizes of bags will be available readily for short, telling, experimental blowing sessions. With such cooperative-minded folks at your service, choosing the right bag may be a matter of little inconvenience.
But all synthetics are not created equal, as each manufacturer will have incorporated what they feel to be the most universally acceptable "standard" sizes, with variables such as the overall shape of the bag, the predetermined (their material take on predestination) placement of the stocks, the length of the neck, and so on. Any one of these parameters may be relatively slight or large in difference to each other, but each will have a profound effect upon our ability to play comfortably and well. When factoring two or three of these "slight" variances together, playing properly may easily become an exercise in futility and disaster.
If, like most pipers, you are able to choose one of the ready-made variety of synthetic pipe bags in their various permutations without deleterious effect upon your musicianship, you're set. But there are many pipers for whom this option remains moot, as their physical dimensions preclude it. If, for example, your arms are not long, and you find that your chanter is angled parallel to the bottom of the bag in final playing position, the stock holes have been located much too far toward the center of the bag, as opposed to the front or neck side; or the shape of the bag may produce a girth that is simply too expansive. Similarly, none of us enjoys playing a pipe with too long or too short a blowpipe, as it tends to throw everything off kilter (no pun intended.) So why should we assume that tying the stocks either farther forward or further back from the bag's center to help accommodate the relative length of our arms, is a choice better left to the bagmakers than to us?
This, and many other factors, combine to render the best choice for many of us the hide bag in all its multiple variations, and its lamentably laborious maintenance requirements, as it provides a way for us to place all of the components of the bagpipe in a configuration that best suits our physique. So, if you have never been comfortable with the instrumental octopus that you have decided to wrestle for dominance and enjoyment (?!), perhaps the fault should not be assumed to be inherent, but perhaps merely a question of locating and designing the right fit for your morphology. The foregoing is a TUNING TIPS™ document provided by Wygent Reeds. Please refer to our Copyright Notice.
Posted in Tuning Tips™ Articles | Comments Off on October, 2000
September, 2000
Written by Mark Wygent on February 6, 2010 – 8:13 AM(Weather Woes...)
I began to fashion and market Great Highland Bagpipe reeds nearly 20 years ago. This obsessive endeavor had its frustrating beginning in April, 1981, in Denver, Colorado, where the semi-arid climate (nearly desert-like lack of moisture in the air), coupled with heat and altitude, presented musicians of my ilk some serious challenges. Twenty-one years previously, I had begun my piping instruction in Detroit, Michigan, where the climate and altitude more or less mimicked conditions in Scotland. We were very wet there, after only short periods of practice.I have stated elsewhere that moisture is the bane of our collective existence as pipers, and we must control it , before it controls us. Moisture is indeed a problem in places like Denver, Phoenix, and Las Vegas; but instead of an overabundance of moisture, there exists a noticeable and distressing dearth of it.
"What?!" you exclaim and sputter. "Too little moisture would be a Godsend! I would gladly swap my inundated instrument for a parched equivalent." Maybe. But then again, maybe not. For example, those of us who have been playing for awhile, and who, as a consequence have tested many reeds dry and right out of a promising box can attest, the chanter reed will not pitch and balance properly until it has absorbed a small amount of moisture. That high-pitched, tortuously imbalanced top and bottom hand that one encounters more often than not with a brand new, bone-dry chanter reed, should be multiplied by an approximate factor of six if it is to be played in a hot, arid environment; and if your intention is to play the thing 2,000 feet or more above sea level to boot, multiply by an additional factor of six to attempt to imagine how difficult it is to maintain proper intonation, balance, and pitch in many places throughout our world.
So what's a piper to do?... Move to a new locale, or control for moisture. When the weather turns cold, heat from our bodies naturally migrates from us to our external environment. When we jump (oh so foolishly) into a large body of cold water, the selfsame event recurs. We simply cannot compel a frosty winter morning to become warmer due to our presence within it, and we certainly are unable to make the ocean warmer by jumping into it. The condition of hypothermia can be life-threatening, and a similarly unpleasant, analogous circumstance rears up when we attempt to take our beautifully maintained and slightly damp bagpipe out of doors in hot, arid, and high climates. All of the water begins to evaporate precipitously, the effects of which condition will be commensurately worsened if we are playing cane reeds all round.
Assuming the latter circumstance is the case, I will offer the following simple suggestions for an easier time of it when playing in a hostile, dry environment... (Obviously, if you are playing some variety of synthetic drone reeds, the following will pertain to cane pipe chanter reeds only.)
- One of the easiest and probably most well-known cures is to add water to the inside of the bag, in its usual form, or to throw in several ice cubes. This last option is probably better, as some of the ice will turn to water vapor, which will more readily and quickly nourish the reeds.
- Remove your cane reeds from your bagpipe on the morning of the competition. Get a thick paper towel, and wet it thoroughly with some water. Carefully wring the water from the towel without shredding the paper, until it is damp. Fold it into quarters, lay your reeds between two doubled layers of the towel, and put the whole neat package into your refrigerator for about 15 minutes. (This can also quickly rejuvenate a set of reeds that was going well the last time you practiced, maybe a week, or a month, or longer ago.)
- Use the ingenious and well-designed Geoff Ross Canister Bag system, but instead of drying out the desiccant within the box, add some water to it, which will end up blowing humidified air directly onto your reeds. Very elegant indeed, and very simple to repeat as desired.
- For Pipe Chanter Reed Only: Go to your local supermarket and purchase a sponge (any color will do) that is approximately one inch thick. Take it home, grab a nickel, and trace the outline of the coin onto the sponge. Having located scissors, slowly and (more or less) accurately, cut out a circular piece of the sponge. Make a hole down the center of the sponge with an awl or (better) a small hole punch. Now push your chanter reed into the center of your wee sponge, staple end first, until the yellow-hemped portion (or reed's seat) is completely through. Gently pull the sponge up onto the lower half of the reed body, so that the sponge is in contact will the thickest (lowest, or bottom) portion of the reed. Add some water to the contraption, and, believe it or not, if you don't take too much time tuning-up, it will hydrate your pipe chanter reed even through a piobaireachd! While everyone else's pipe pitches like piccolo, your chanter will still be in tune with your drones.
Posted in Tuning Tips™ Articles | Comments Off on September, 2000